An achilles heel (or two) for the great and powerful Storyboard
Since Xcode 4.2, we have had storyboards. And while many developers saw them as a nuisance at first, storyboards have become more and more important with the advent of new phone sizes. And they are pretty great. We can get a view into our entire app and how its various views connect up with one another, a sense of the “flow” our users will experience. We can build a rough estimate of how each view will look, and share that with designers. In more recent versions of xcode, we can even review our UI on the different size screens.
However, even with all of this functionality, there are two major drawbacks to using storyboards:
1) Version control conflicts
Xibs are effectively stored as xml. And when two programmers are working on parts of a storyboard at the same time on their own systems and then want commit their code up to a central repository, one of them is going to have to integrate the other’s work into their version first. And storyboards do not make that easy.
It becomes a rather involved exercise of examinining the xml for the conflicts and then knowing which are the moving parts you wish to keep / discard (without being able to see the storyboard until you have made ALL changes.) This is pretty much unacceptable. While a programmer who has a strong eye for XML may be able to piece it all together with some efficiency, for most of us it will eat away at the cost / benefit of using storyboards to begin with.
2) Machine performance for large models
To a lesser extent, as Storyboards become large, they tend to act a bit funky / freeze up. Ask many developers who have 16GB RAM in their machine, and a new MacBook Pro laptop with strong CPU and they still may run into issues. (Take this as anecdotal and not necessarily what you will experience, but may still be good to pre-empt a potentially knotty situation!)
To the rescue: Xibs
The xib was a popular GUI element prior to the advent of storyboards and continues to have strong support, namely because it supports much of the upside of Storyboards without the level of version control conflicts and processor issues you may encounter on some machines. To be clear, you wouldn’t see the same level of version control conflicts because generally speaking, developers do not work on the same view at the same time (and xibs, as you will soon see, usually represent just a single view.)
So what is a xib?
A xib is a drag-and-drop GUI for a UIView. It is one type of “Interface Builder” or “IB” file you can build in Xcode. You can add UILabels, UITextViews, UIButtons, subviews, custom views, and pretty much any object that inherits from UIView, to it.
Part I: Xibs with storyboards
This tutorial will describe how to setup a xib with an existing storyboard. In a future tutorial, we will demonstrate how to setup a xib without a storyboard. And in a later post we will go over how to segue from one view to another in code, to ensure you are completely setup with the tools necessary to use xibs.
Getting setup
To add a xib file to your project in Xcode 6, go to File –> New –> File.
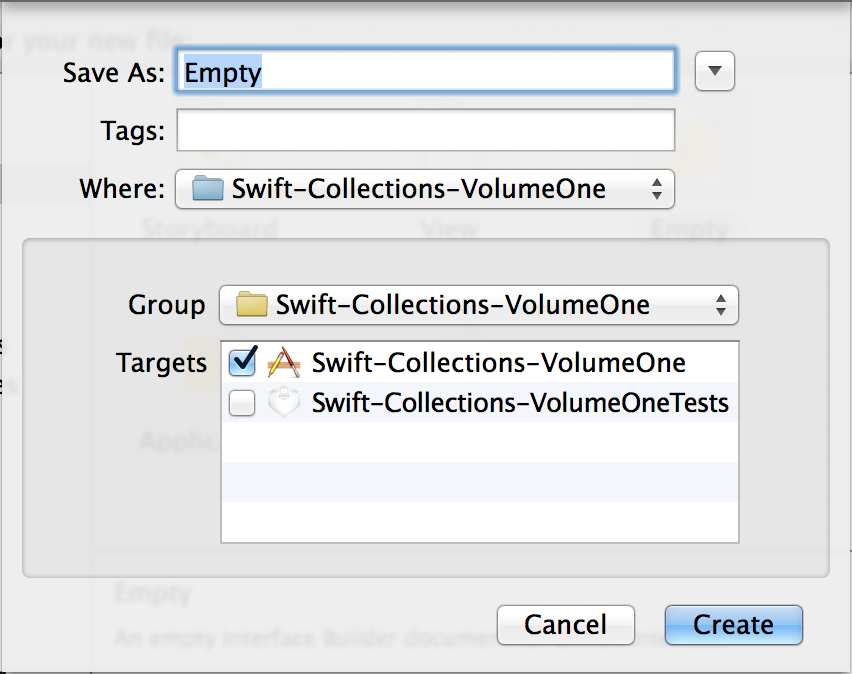
Click on User Interface from the choices on the left, and then choose View (or Empty) on the right.
Click next.
You will be prompted to save the file with a name. It is customary to save it with the name of the UIView class to which you will be associating this IB file.
Just as you would with a storyboard, you can drag objects from the Object Library onto the canvas. I suggest beginning with a View because most xibs you build do need
Now here is the meat of it. Most folks (and blog posts) seem to either miss this part, or just not get it quite right. This is what you need to do:
Build out the xib
Add a single view at a custom size of 160 points by 80 points (or resize your view if you already have it on screen.) You could have a view that is full size, but then it will be tougher to see how these can be reused on a storyboard as we will demonstrate. Then dragged a UILabel onto the UIView and center it. Add some text to it like we have done here.
Setup outlets from the xib to the class associated with the xib
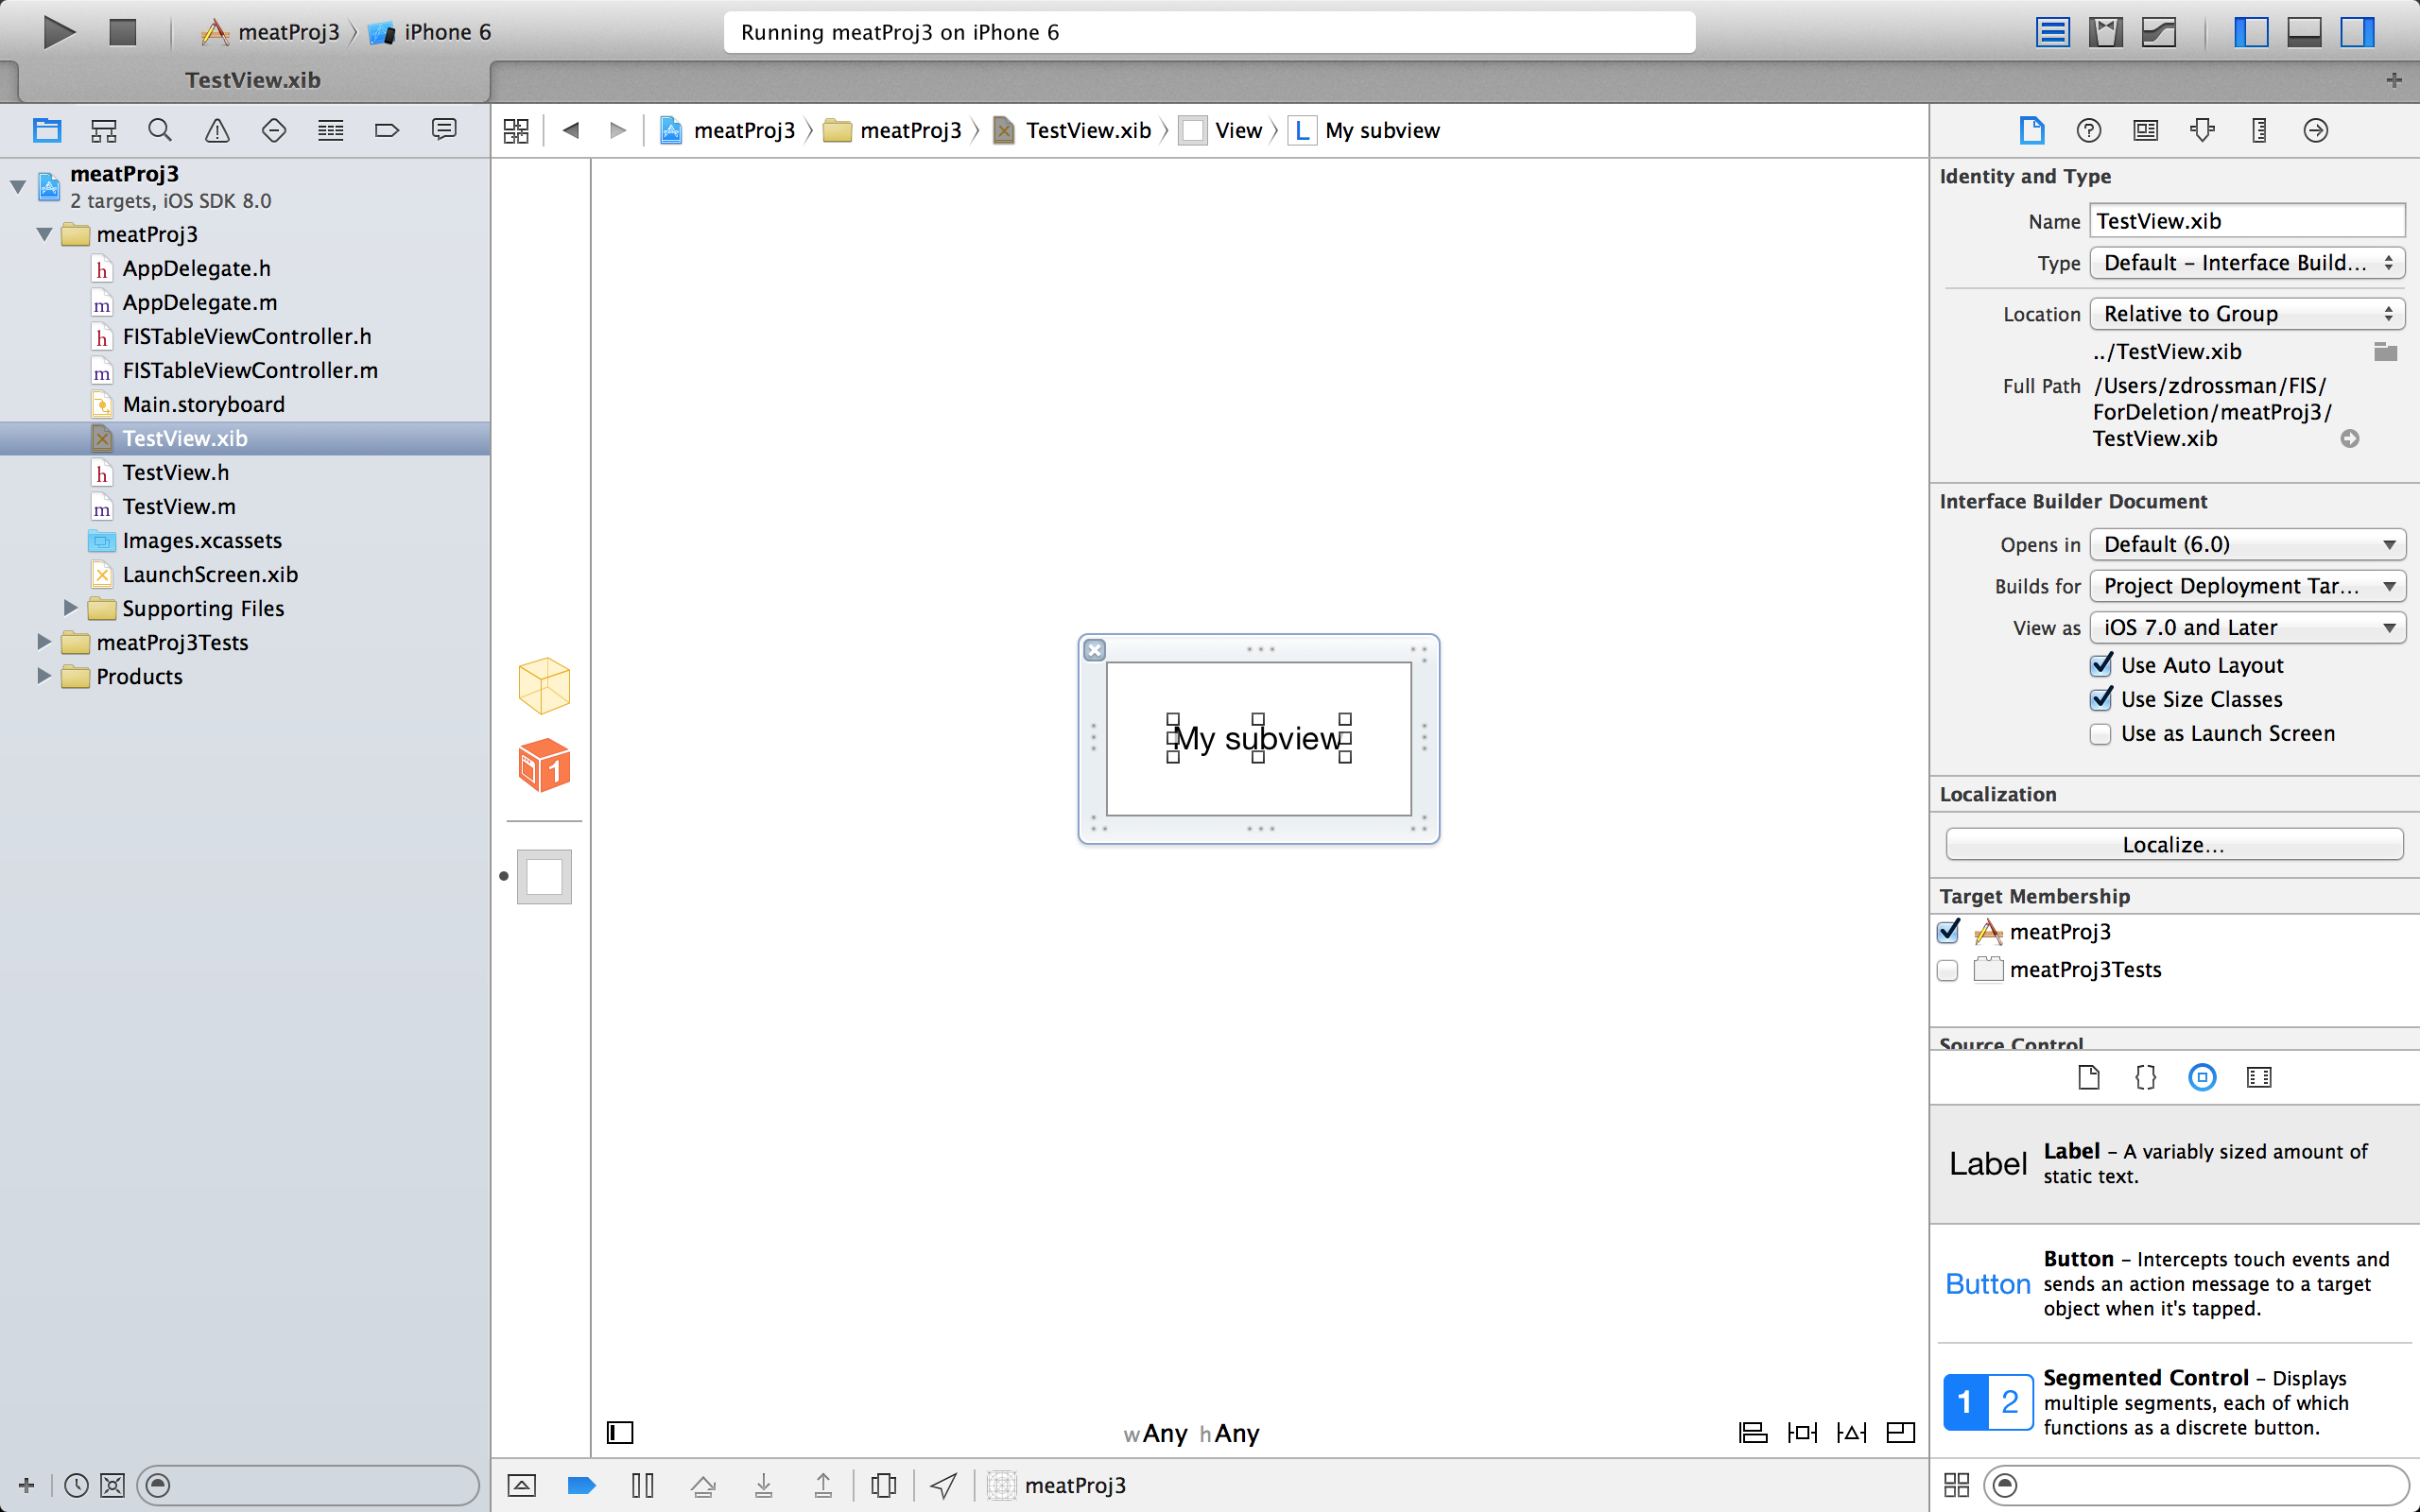
Next, drag both the UIView and the UILabel objects from the xib canvas to the associated .h file of the class. You will need to be in “Assistant Editor” mode to do this (to see both on screen at the same time.) In case you have not previously done this with a Storyboard, or as a refresher, you will need to hold down the CTRL key when you drag. You will see the line from the object to the class. Let go when you your cursor is between the @interface and @end section of the file.
You will be adding outlets which is the default. Your UIView may be called view and your UILabel may be called label as we have shown here.
Setup initWithCoder in the class associated with your xib
In most of our code, when we initialize a view, we use the initWithFrame (or plain init) method as a default or designated initializer. However, when initializing a UIView from a storyboard, we use initWithCoder:. It is this method that will be called when the Storyboard goes to load the UIView.
We have added some code to this method as well. The loadNibNamed: method call is where the magic happens that loads the xib, instead of seeking out the interface in code alone.
Note: The class associated with the xib file should be a subclass of UIView, and generally not UIViewController. Note the line of code that adds our view object to the xib. This may not seem entirely intuitive at first, but make sure you do add the view object as a subview of the view class.
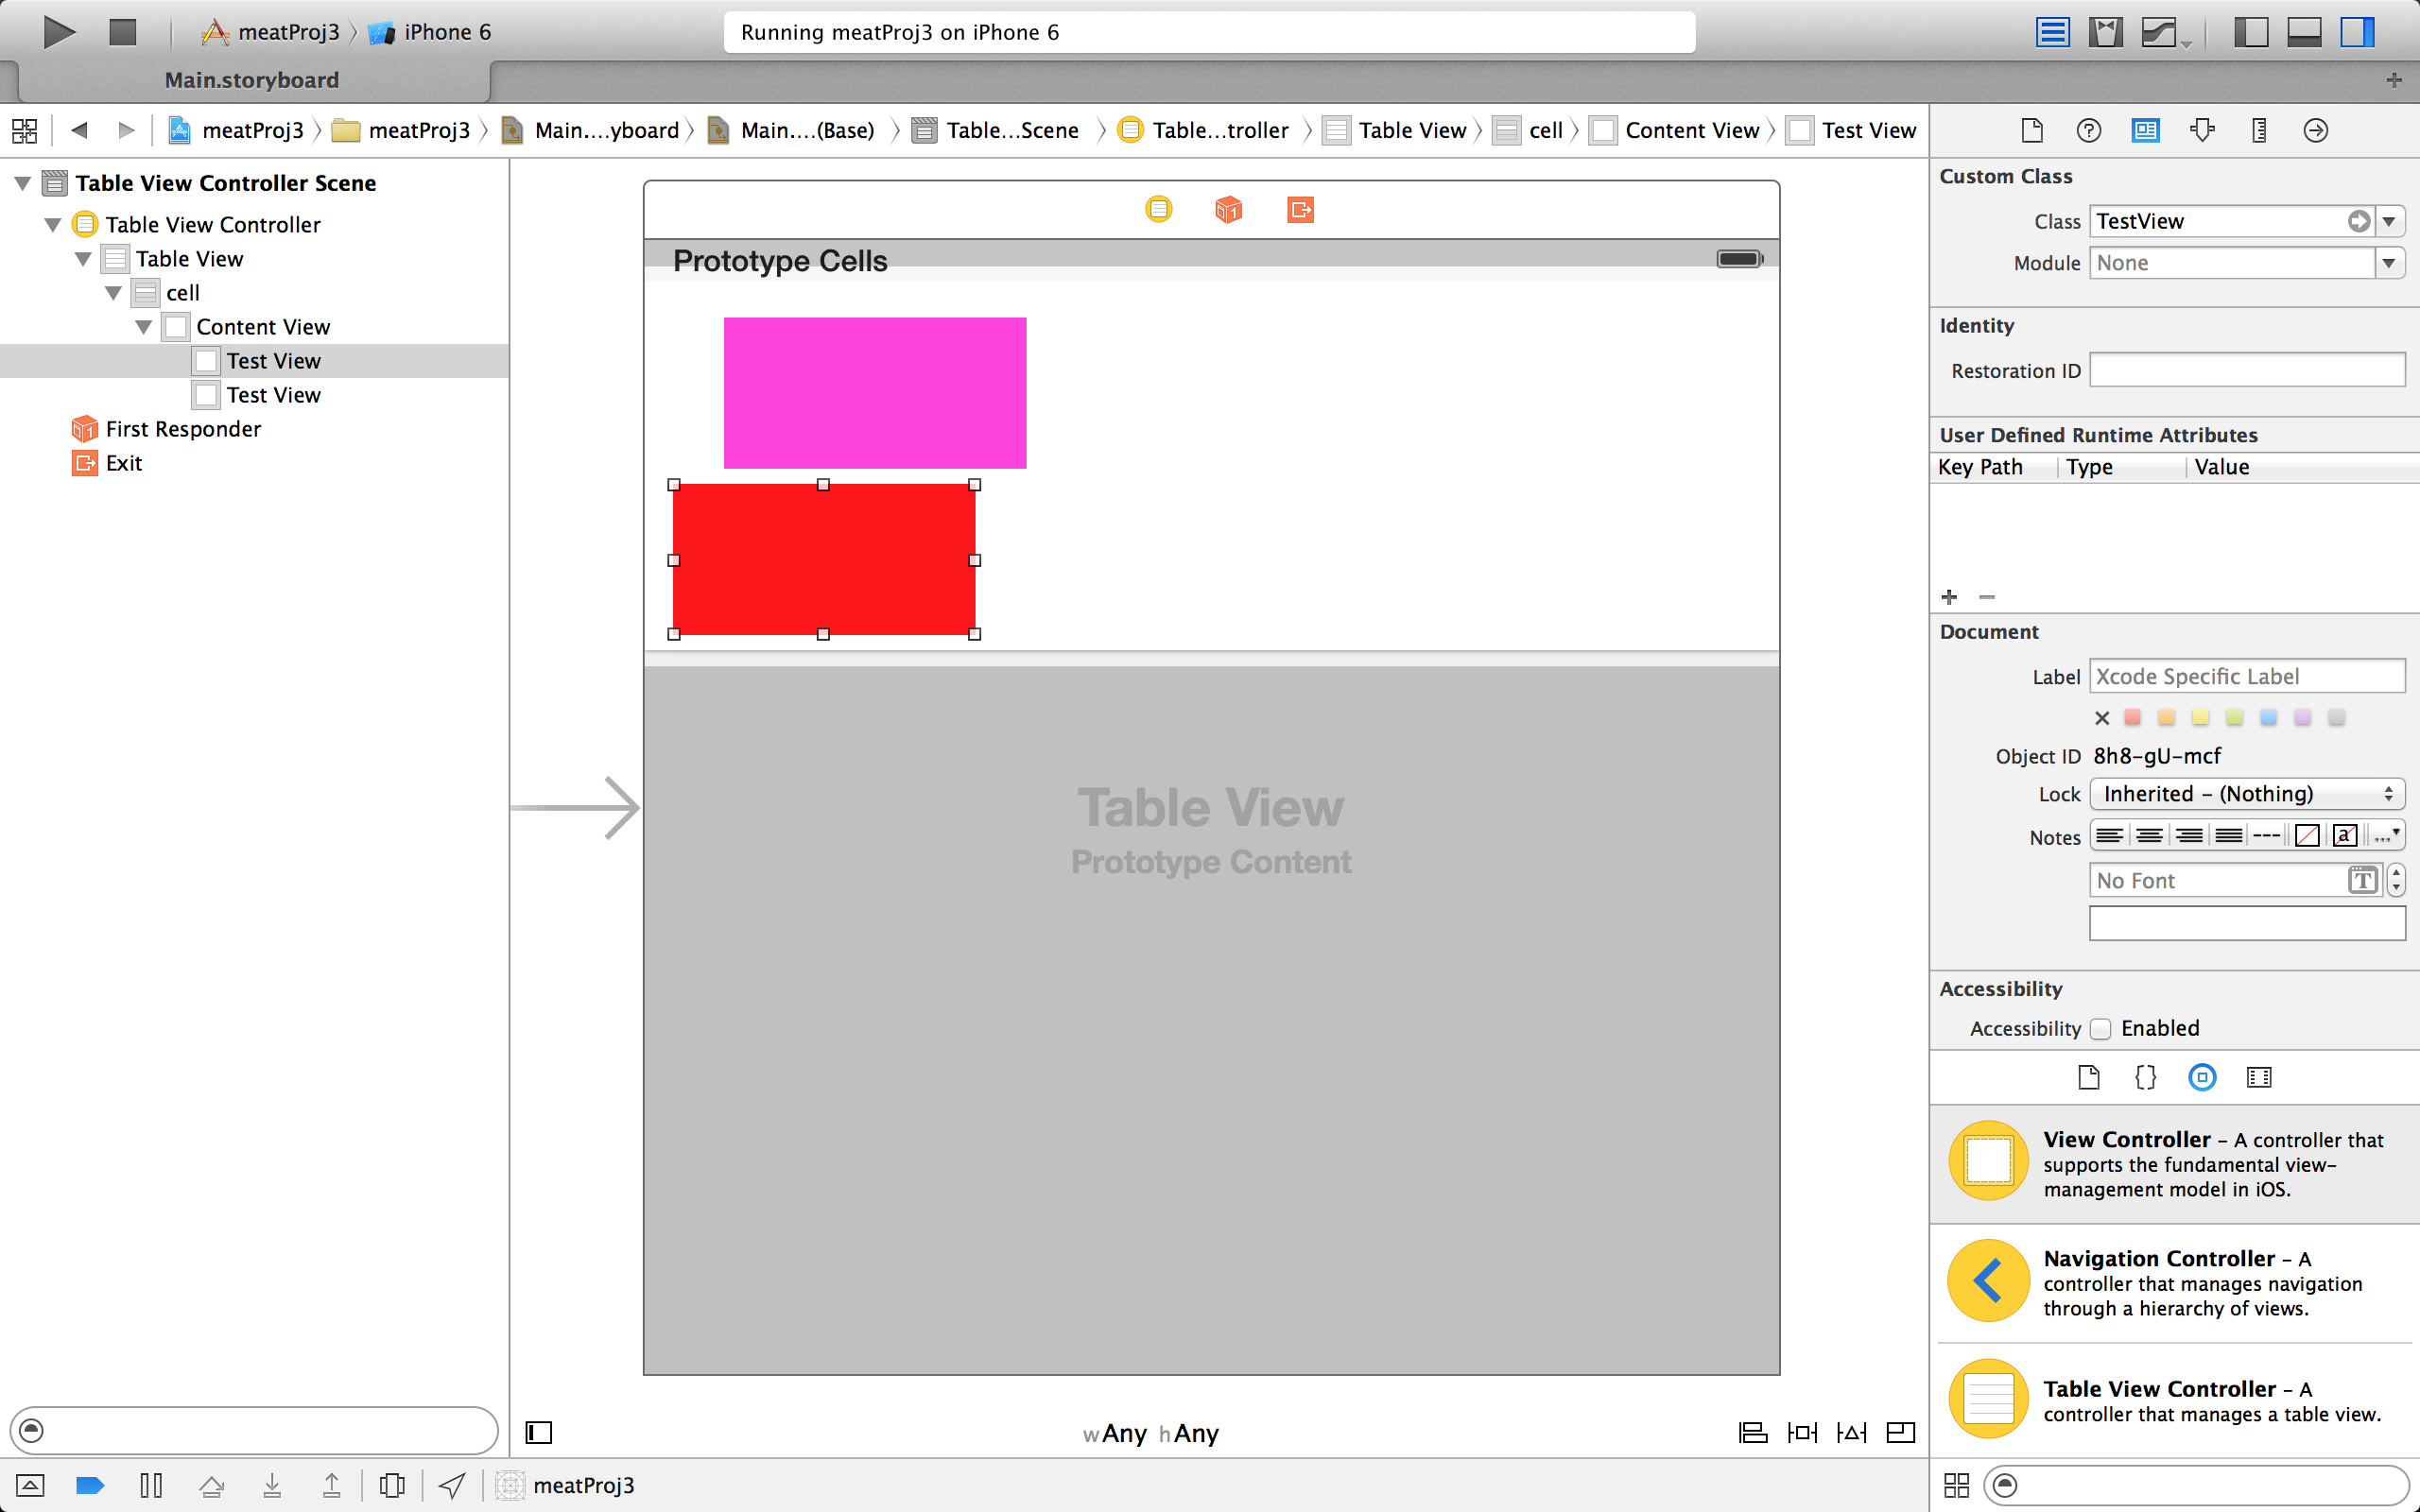
Subclass the File’s Owner
Now this is an important step and one that I’ve seen many folks forget (me, for one, to include in this post originally!) or do incorrectly. We need to tell Xcode the appropriate class for the File’s Owner. So in your right hand pane, make sure you add your custom class name to the Custom Class field in the Identity Inspector. Make sure the File’s Owner is selected when you do this. You’ll see the File’s Owner represented by a transparent yellow box at the top of the Document Outline.
Often, I’ve seen folks attempt to set the View as a subclass of it’s associated class using the same method I describe above. Do not make this mistake. You’ll end up in an infinite loop.
Add your custom view to a storyboard view
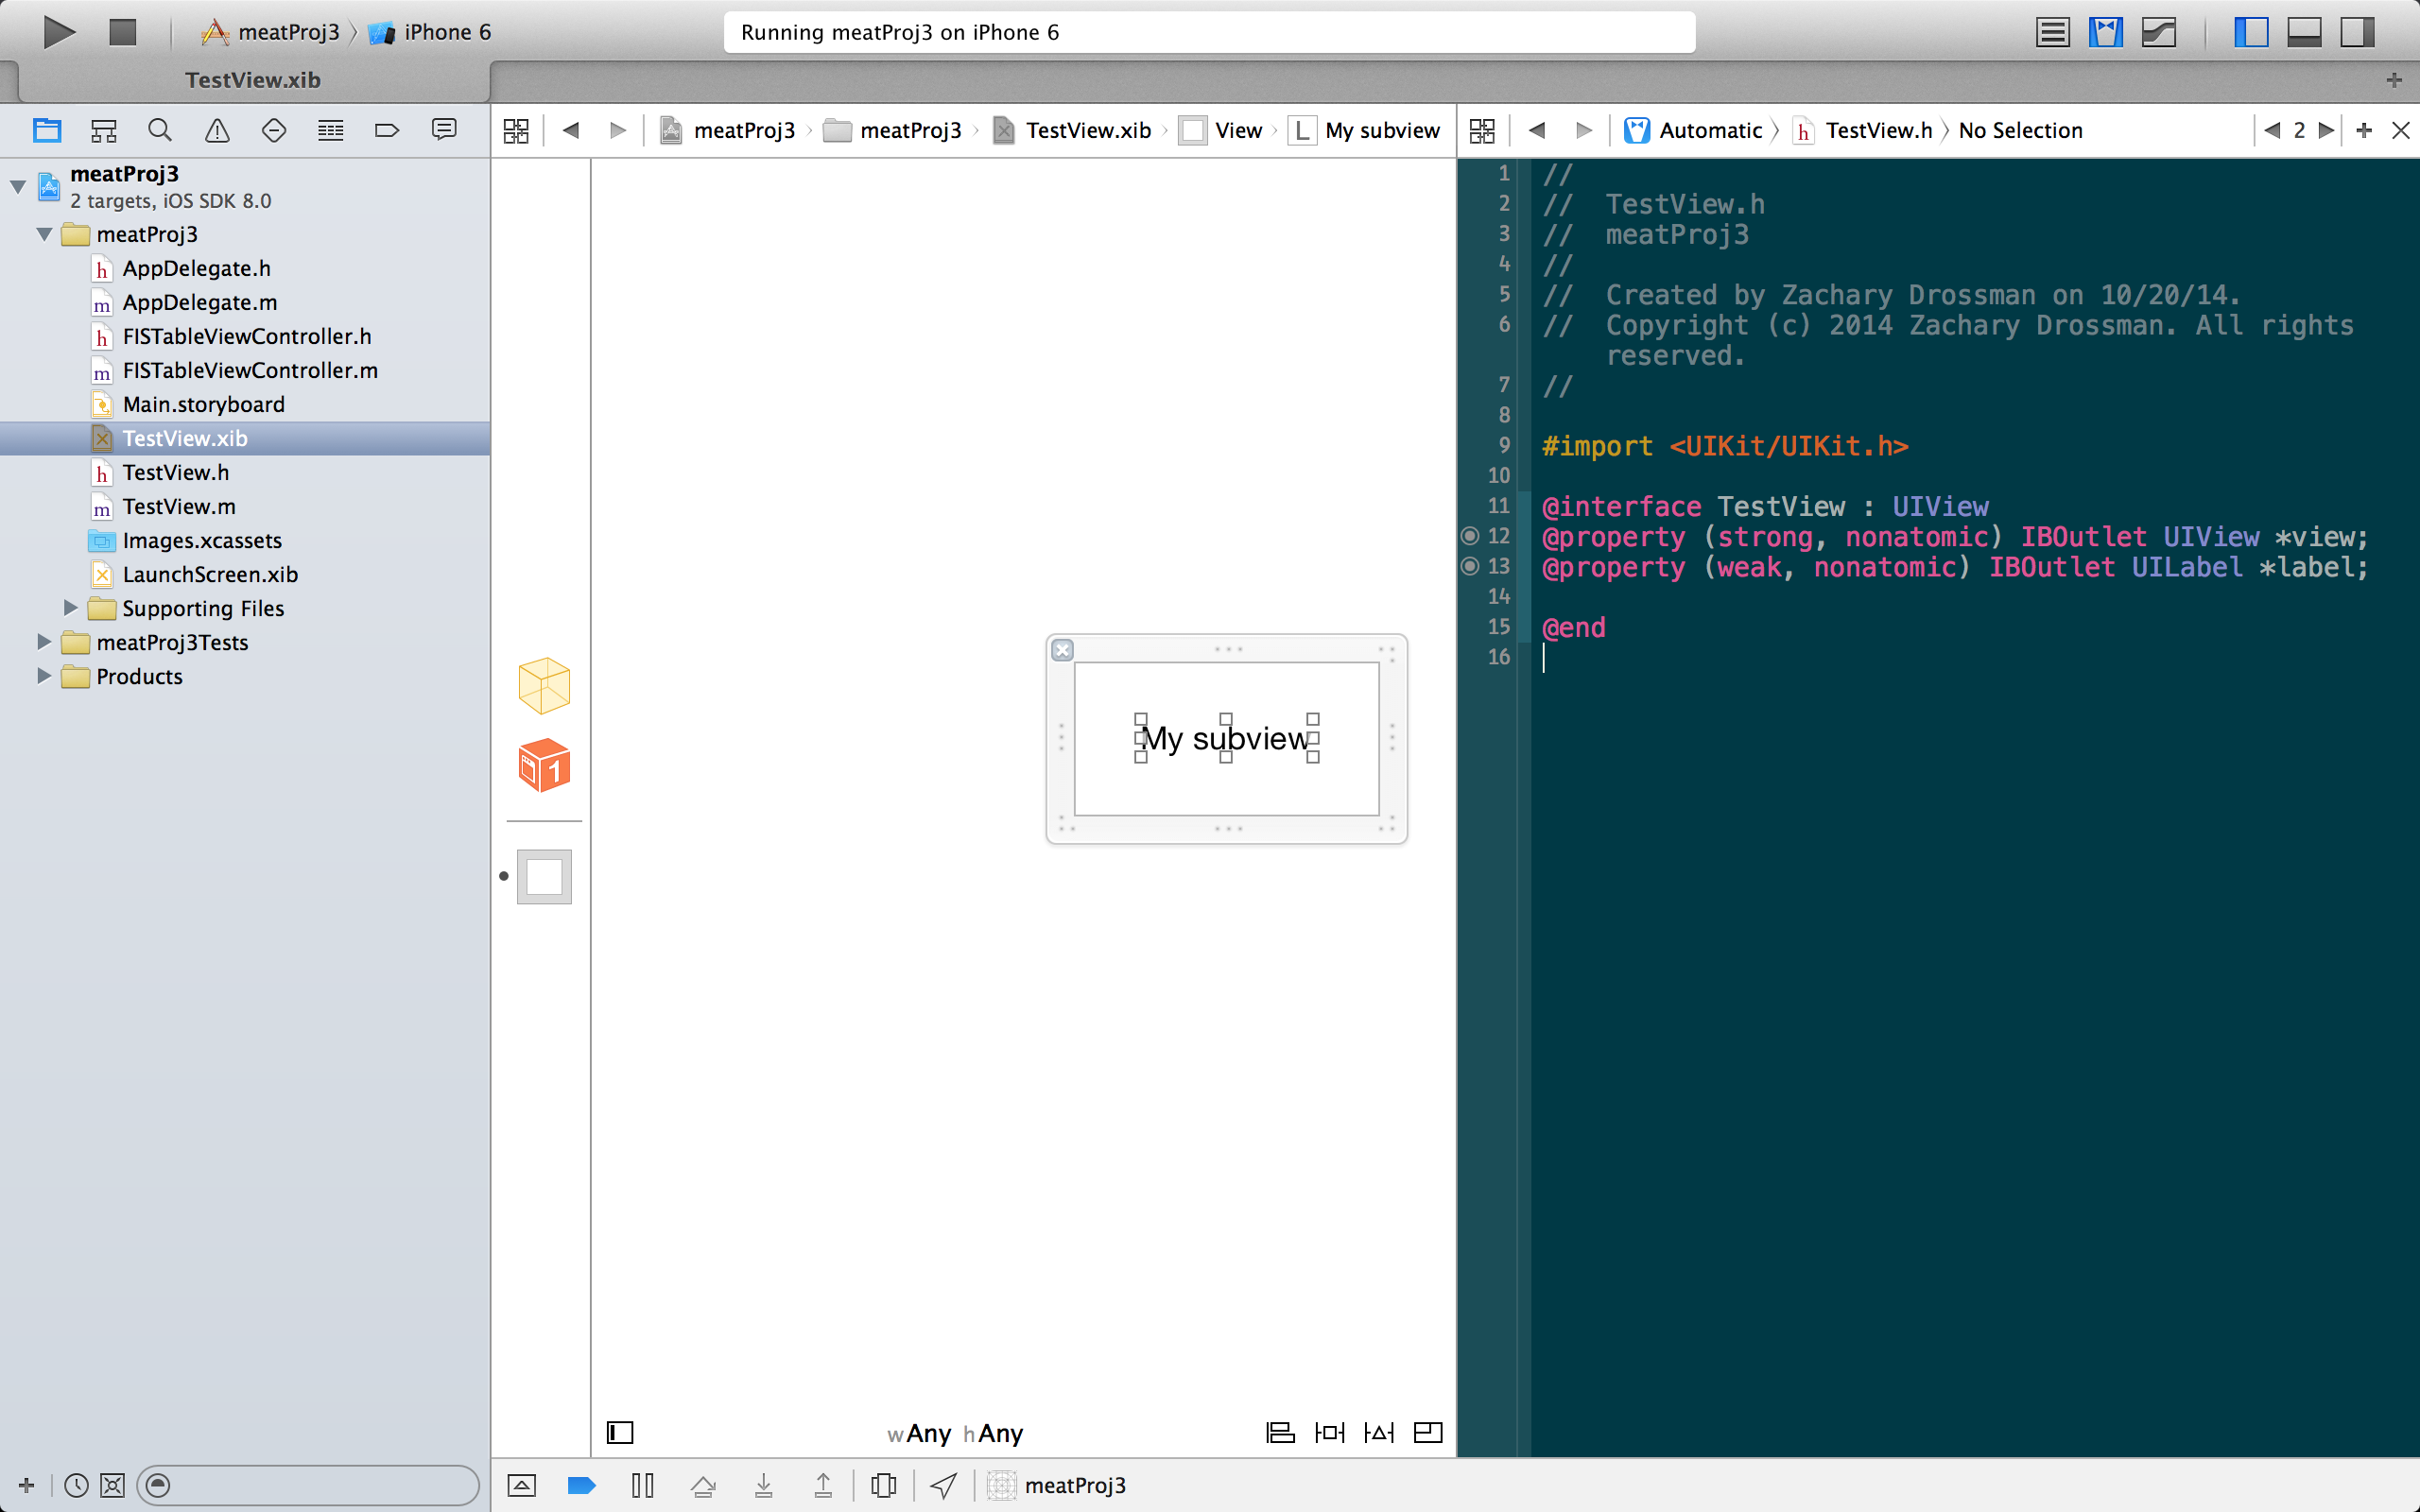
Head over to the storyboard and add a UIView object. Resize the object to be the same size as the xib frame. (At least for sanity’s sake. Keep in mind that if you are actually using xibs to skin entire view controllers, the size will be determined by the view controller’s size when you are using autolayout.)
I’ve added my subview a couple of times to a UITableViewCell in a UITableViewController.
Now subclass your UIView to be the same as the class you want to show up.
And voila!
You should now be able to run your program and see your beautiful xibs pop up on screen as expected!
Ahh testing. Here’s a topic that warrants an entire book. Or bookshelf.
As a programmer, we are often in the weeds, writing new code, and more frequently editing existing code for that new feature set, bug we found yesterday, or requested changes from our designer. Whatever the case, it can be a challenge to take a step back and think about the requirements of our projects, and how best to implement the logic we are attempting to type in our text editors.
Additionally, if we make a change to a code base, how do we know for sure we haven’t upset those requirements, and / or various dependencies on our code?
What is Unit Testing?
Unit testing is the first line of defense against creating more headaches for ourselves as developers than we were initially trying to solve for.
When we say unit testing, we mean verifying specific units of our code are working as expected. Traditionally in Objective-C, by unit we mean a single Class.
How to Unit Test
Prerequisite: Toolkit
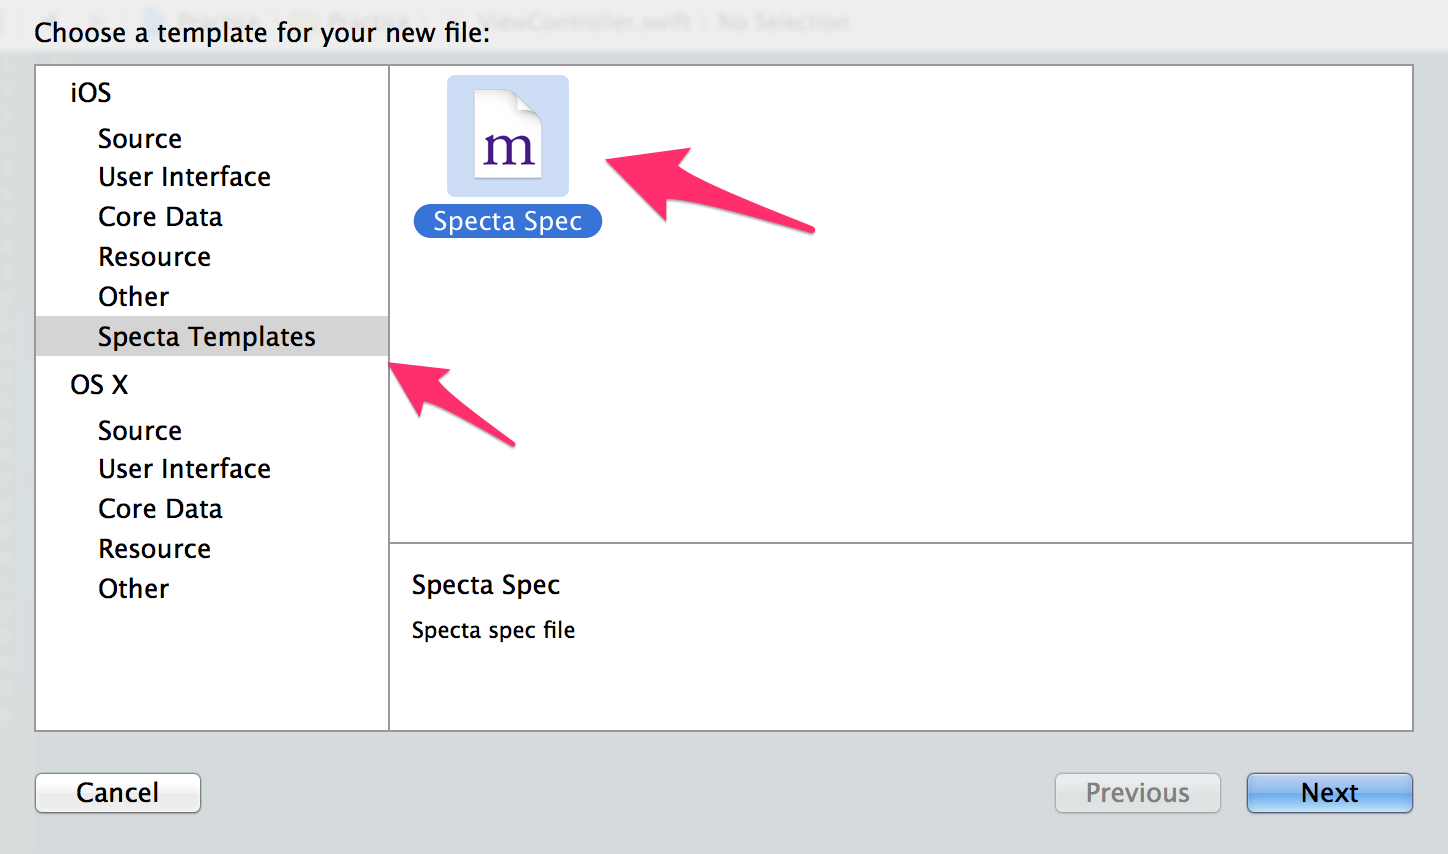
In order to properly unit test in Objective-C, we must first choose our weapon – the testing spec library we will use to write our tests. For the sake of this blog post (and what I generally use) we will use the combination of Specta and Expecta. We recommend installing these libraries through Cocoapods.
You can then access this template via the File menu, by clicking on “New File” and then choosing “Specta Templates” in the left hand panel.
Prerequisite: File Setup
Upon opening the Specta Template, there are only a few steps in order to get up and running (once you have added the Specta and Expecta libraries to your Podfile.) Namely, the top of your spec should look like this:
123456
#import "Specta.h"#import <The file name of the class you are testing>#define EXP_SHORTHAND#import "Expecta.h"SpecBegin(<Theclassyouaretestinggoeshere,withouttheextension>)
Note: It is important that you define EXP_SHORTHAND before importing the Expecta.h file in the code.
How to Write Useful Tests
The following is a slightly modified example of unit testing from one of our labs:
#import "Specta.h"#import "Pet.h"#define EXP_SHORTHAND#import "Expecta.h"SpecBegin(Pet)describe(@"Pet",^{describe(@"makeASound",^{it(@"should be an instance method",^{Pet*cutePet=[[Petalloc]init];expect(cutePet).to.respondTo(@selector(makeASound));});it(@"should return the appropriate NSString",^{Pet*cutePet=[[Petalloc]init];expect([cutePetmakeASound]).to.equal(@"Pet me!");});});describe(@"eatSomething",^{it(@"should be an instance method",^{Pet*cutePet=[[Petalloc]init];expect(cutePet).to.respondTo(@selector(eatSomething));});it(@"should return the appropriate NSString",^{Pet*cutePet=[[Petalloc]init];expect([cutePeteatSomething]).to.equal(@"Nom nom nom.");});});});SpecEnd
We’ll describe how these tests work, line by line.
Tests are developed as a set of nested blocks. If you haven’t yet learned about blocks, all you need to know for now is that they begin with ^{ and end with }. For the sake of testing, you can think of blocks as simply a way to delineate sections of code into sub-sections. (There is a lot more to blocks, but for another day.)
Unit testing combines two types of blocks. These are describe blocks and it blocks. Think of testing as a form of outline. Every describe block may contain a describe block within it, but eventually it must end in it’s innermost block being an it block (or multiple it blocks). The it block actually performs a test. Describe blocks simply allow us to build meaningful descriptions (surprise!) of the tests we are about to perform.
So at the outermost level of our unit tests, we begin with a describe block that describes the class we will be testing. In our example, that will be Pet.
Within that block, we create additional describe blocks. Our first describes makeASound, a method we want to create in our Pet class. We can see makeASound should be an instance method from the first it block, and that it should return an NSString, based on the second it block.
The language used to test within an it block begins with the word expect, and takes an argument for the thing we want to test. In our first it block, we are expecting the object cutePet to respondTo the selector (aka method) makeASound. By implementing this test, if our class does not include this method, we will get notified.
Note: it blocks should generally only contain a single test, i.e. expect statement.
Additional note: For a method with arguments, the selector will include the : but not the argument names. For instance, if I had the following method…
…the selector would be @selector(doSomethingWithName:AndBirthday:).
The cool thing about this test is that by using these nested describe and it blocks, when we run our tests the first test will read: “Pet makeASound should be an instance method.” Our test results can now be read in plain english.
In our second test, we expect that the return value of the method makeASound will be an NSString and that NSString will have the value `@“Pet me!”‘’
The second set of tests is very similar. For more examples, check out the next section: Standard Types of Unit Tests.
But before we look at other tests, we should think about how these tests might be written more concisely. For instance, you’ll notice that in every it block we initialize an Pet in order to test that class’s instance methods. Wouldn’t it be nice if we could just write that initialization statement once?
Well, as you probably noted if you have opened the Specta Template already, there are in fact, four blocks we have not talked about yet. These are your beforeAll, beforeEach, afterEach, and afterAll blocks. These blocks allow us to run a piece of code either, once (beforeAll) prior to the tests running, or prior to each test (beforeEach), and similarly following each test being run (afterEach) and every test being run (afterAll). So a better way to write the code above would be the following:
#import "Specta.h"#import "Pet.h"#define EXP_SHORTHAND#import "Expecta.h"SpecBegin(Pet)describe(@"Pet",^{__blockPet*cutePet;beforeAll(^{cutePet=[[Petalloc]init];});describe(@"makeASound",^{it(@"should be an instance method",^{expect(cutePet).to.respondTo(@selector(makeASound));});it(@"should return the appropriate NSString",^{expect([cutePetmakeASound]).to.equal(@"Pet me!");});});describe(@"eatSomething",^{it(@"should be an instance method",^{expect(cutePet).to.respondTo(@selector(eatSomething));});it(@"should return the appropriate NSString",^{expect([cutePeteatSomething]).to.equal(@"Nom nom nom.");});});});SpecEnd
You’ll notice in the above, I have declared my variable cutePet outside of the beforeAll block. This is because as with any variable, we need to make sure it has the proper scope to be used elsewhere in our code. This is no different than initializing a variable inside of an if statement, where we would only have access to it between the if statement’s brackets.
That said, you are probably wondering why I have written __block prior to declaring the variable.
For safety, and this will be further elaborated upon in a lesson on blocks, variables used within a block must be designated this way if they are to be written to. (Note: If you do not use the __block syntax and attempt to set a variable inside of a block to a new value, that value will only persist while inside of the block.) In short, expect to be using __block syntax for all variables that will be used across various tests.
Now back to our regularly scheduled program…
One last thing before moving on to standard unit test examples. Let’s make sure we’re all clear on when to use beforeAll / afterAll vs. beforeEach / afterEach. Using all means that if we initialize a variable there, and we make changes to this variable in the tests, those changes will persist. beforeEach is more like having a new instance in each test, as we did earlier in this tutorial.
// compares objects or primitives x and y and passes if they are identical (==) // or equivalent (isEqual:).expect(x).to.equal(y);//Examplesexpect([@2integerValue]+[@3integerValue]).to.equal([@5integerValue]);expect([myObjectdescription]).to.equal(@"This is my object");
Something to keep in mind about:
1
-(BOOL)isEqual:(id)other
The isEqual matcher does one of two things; either it checks to see if they are == the same (as in the same memory address), or that the objects evaluate to the same value (e.g. @5 = @5). If you are trying to use isEqual with custom objects, however, you must override the isEqual method of NSObject so that the matcher knows how to evaluate the equivalency.
For instance, if you had an Car object, you might want to check in your isEqual override that the model, year, and color are all the same, and only then return YES, to determine equality.
beNil
12345
// passes if x is nil.expect(x).to.beNil();//Examplesexpect([myObjectremoveFromDataSet]).to.beNil();
beTruthy / beFalsy
123456789
// passes if x evaluates to true (non-zero).expect(x).to.beTruthy();// passes if x evaluates to false (zero).expect(x).to.beFalsy();//Examplesexpect([DogcanPurr]).to.beFalsy();expect([CatcanPurr]).to.beTruthy();
beInstanceOf
123456
// passes if x is an instance of a class Foo.expect(x).to.beInstanceOf([Fooclass]);//ExamplesDog*dog=[Dogalloc]init]expect(dog).to.beInstanceOf([Dogclass]);
beKindOf
1234567
// passes if x is an instance of a class Foo or if x is an instance of any class // that inherits from the class Foo.expect(x).to.beKindOf([Fooclass]);//ExamplesDog*dog=[Dogalloc]init]expect(dog).to.beKindOf([Petclass]);
beginWith / startWith / endWith
1234567891011121314151617
// passes if an instance of NSString, NSArray, or NSOrderedSet x begins with y.// also aliased by startWith// the expect argument must be of the same type as the beginWith argumentexpect(x).to.beginWith(y);// passes if an instance of NSString, NSArray, or NSOrderedSet x ends with y.// the expect argument must be of the same type as the endWith argumentexpect(x).to.endWith(y);//ExamplesNSString*myName=@"Zach"expect(myName).to.beginWith(@"Za");expect(myName).to.endWith(@"ch");NSArray*myFriends=@[@"Joe",@"Chris",@"Al"];expect(myFriends).to.beginWith(@[@"Joe"]);expect(myFriends).to.endWith(@[@"Al"]);
beIdenticalTo
12345678910
// compares objects x and y and passes if they are identical and have the // same memory address.expect(x).to.beIdenticalTo(y);// Examples:Dog*dog=[Dogalloc]init];Pet*pet=(Pet*)dog;expect(dog).to.beIdenticalTo(pet);
contain
123456789
// passes if an instance of NSArray or NSString x contains y.expect(x).to.contain(y);// Examples:expect(@"This is my name").to.contain(@"is ");NSArray*myNameSentence=@[@"This",@"is",@"my",@"name"];expect(myNameSentence).to.contain(@"is");
Less commonly used matchers, but still interesting
// passes if an instance of NSArray, NSSet, NSDictionary or NSOrderedSet x // contains all elements of y.expect(x).to.beSupersetOf(y);// passes if an instance of NSArray, NSSet, NSDictionary or NSString x has // a count or length of y.expect(x).to.haveCountOf(y);// passes if an instance of NSArray, NSSet, NSDictionary or NSString x has // a count or length of 0.expect(x).to.beEmpty();// passes if the class Foo is a subclass of the class Bar or if it is identical to // the class Bar. // Use beKindOf() for class clusters.expect([Fooclass]).to.beSubclassOf([Barclass]);// passes if x is less than y.expect(x).to.beLessThan(y);// passes if x is less than or equal to y.expect(x).to.beLessThanOrEqualTo(y);// passes if x is greater than y.expect(x).to.beGreaterThan(y);// passes if x is greater than or equal to y.expect(x).to.beGreaterThanOrEqualTo(y);// passes if x is in the range of y and z.expect(x).to.beInTheRangeOf(y,z);// passes if x is close to y.expect(x).to.beCloseTo(y);// passes if x is close to y within z.expect(x).to.beCloseToWithin(y,z);// passes if a given block of code raises an exception named ExceptionName.expect(^{/* code */}).to.raise(@"ExceptionName");// passes if a given block of code raises any exception.expect(^{/* code */}).to.raiseAny();// passes if x conforms to the protocol y.expect(x).to.conformTo(y);// passes if x responds to the selector y.expect(x).to.respondTo(y);// passes if a given block of code generates an NSNotification named NotificationName.expect(^{/* code */}).to.notify(@"NotificationName");// passes if a given block of code generates an NSNotification equal to the passed // notification.expect(^{/* code */}).to.notify(notification);
Unexpected Behaviors
If you forget to place () after the matcher (e.g. to.beNil vs. to.beNil() ), your test will simply not evaluate. It will appear to pass even if it is failing. Be sure to include your parentheses!
Tests will be ignored if not written appropriately inside of an it block. So you might think they are passing when they are effectively not even part of the tests. Make sure all tests are written inside it blocks!
Tests do not run in a specified order. This is particularly an issue because you might think that you can use a beforeAll block when they need a beforeEach block, simply because their tests run in an order that affects the state of the variable you created before the tests began in a way you are not expecting. Make sure you consider the state of the program for each test independently from every other.
Common Error Messages
We’ve all done this one before: Opening the .xcodeproj instead of the .xcworkspace and attempting to test. Your testing frameworks will not be a part of the project. You will get an Apple Mach-O Linker Error and in the detail see something that says library not found for -lPods... This is a good sign that all you have to do is close down the xcodeproj and open up the xcworkspace and you’ll be back in business!
This automates the use of the activity indicator to start and stop as needed, instead of keeping a count of the number of operations that are downloading/uploading data!
Entropy: How to show a photo in Octopress that you have on your local machine:
1) First, put it into /source/images within the Octopress folder.
2) Use a PNG (maybe you can use other formats, but PNG should definitely work.)
3) Use classic HTML, ignore the format shown on the Octopress website!
I’m using this week’s blog post to spur conversation about a topic in class. So if you are a reader who is not in my class, you may want to skip this one. Or comment. That would be great too.
Integration of Parse with Core Data seems to come up fairly often in conversation (what parties do I go to?).
So, I wanted to hypothesize here a bit on how I might do this. And in a future post, elaborate on how I actually did do it (if different / or more nuanced from the way I describe the process here)
I believe the most straightforward (I did not say most elegant) way to integrate core data and Parse is the following:
First a few prerequisites:
A) Do NOT use PFObject subclassing for your local objects.
B) Implement boilerplate core data code (with or without fetched results controller to your liking.)
C) Create a DataManager object that is a singleton.
Then, get started:
1) Write a category to each NSManagedObject that effectively takes the place of a custom initializer; this custom initializer will take each key/value pair from the PFObject and assign it to the appropriate attribute of the NSManagedObject. Like I said, this isn’t the most elegant way of doing things. I have seen NSHipster articles and Github repos that suggest using NSValueTransformer, but I’m not ready to metaprogram my process.
2) Write a method in DataManager that converts each NSManagedObject type back into a PFObject. (There will be one method for each type of NSManagedObject, like in step #1.)
3) Write a method in DataManager that creates a new NSManagedObject based on a PFObject and PFObject’s class.
4) Call #3 from your ViewController; and then #1 from here as well.
5) When ready to save to Parse, call #2 from your ViewController.
Regular expressions are anything but. Here are some ways to remember how to use them via example.
First, the NSRegularExpression class, and how it is used:
12345678910
NSString*phoneSentence=@"My phone number is 555-1212";NSRegularExpression*regex=[NSRegularExpressionregularExpressionWithPattern:@"."options:NSRegularExpressionCaseInsensitiveerror:nil];NSArray*matches=[regexmatchesInString:phoneSentenceoptions:NSMatchingWithoutAnchoringBoundsrange:NSMakeRange(0,[phoneSentencelength])];NSLog(@"All matches: %@",matches);NSTextCheckingResult*match=matches[0];NSRangerange=match.range;NSString*matchString=[[phoneSentencesubstringFromIndex:range.location]substringToIndex:range.location+range.length];NSLog(@"First match: %@",matchString);
Create a regular expression using NSRegularExpression. Consider options such as case insensitivity and continuation across lines (NSRegularExpressionDotMatchesLineSeparators). We did not record the error here, though you are certainly welcome to.
Our simple regex pattern here is “.”, which effectively means, find every individual character.
This method returns an array of NSTextCheckingResults, or ranges in which matches were found.
3) Everything after this method
The rest of this code is simply meant to produce the expected result for the first match, which will be a capital “M”. What you do with the ranges once you have them is up to you. That’s the easy part, because you are no longer dealing with regular expressions.
So what are some regular expression operators you should know?
{n} - match something exactly n times
{n, } - match at least n times (as many times as possible)
{n, m} - match between n and m times, inclusive
| - match either before or after the pipe
And what are some metacharacters you should know?
\d - Match any decimal digit in the Unicode set of characters
\D - Match any non decimal digit
\r - Match a carriage return
\s - Match a whitespace character
. - Match any character
^ - Match only if at the beginning of the line
$ - Match only from the end of the line
\ - Character escape for the following characters: * ? + [ { } ( ) ^ $ | \ . /
So some nice regular expressions to have in your back pocket (please note I have not validated these!):
So you’re finally at the point in your app where you have to make a network call. Let’s say your app downloads pictures of cats from the interwebs. A network call is the process of asking the web for something and then waiting for it to come back to you with what you asked for. Or not. What if the internet has no pictures of cats on it anywhere? In that case, your request will come back with nothing at all.
So, to prepare for these possibilities, we use completion handlers. Completion handlers tell us whether or not a certain process completed with the results we expected.
Step 1: Create a CompletionBlock typedef.
This step isn’t crucial, but it will make your code look neater, so I recommend it.
You can think of a typedef as an alias. I’m not sure that’s a perfect analogy, but it’ll do for now if this is your first typedef.
An example of a basic typedef:
1
typedef unsigned char BYTE;
This typedef lets us use the word BYTE in place of “unisigned char” anytime we declare a variable.
For a block, our typedef might look something like this:
NB: You might think you need a name for your completion block at the end of the typedef. I’m not actually sure why you do not, but this will name it CompletionBlock, just as if you were writing a standard function.
Step2: Create a method that takes a Completion block as an argument, e.g.
How we define this method is as follows (using pseudocode, since we don’t have a specific use case in mind):
12345678910
-(void) getObjectsInBackgroundWithBlock:(CompletionBlock)completionBlock
{
  // Run a request for information from a web source

  dispatch_queue_t downloadQueue = dispatch_queue_create("Get our data", NULL);
  dispatch_async(downloadQueue, ^{
      NSError *error;
      completionBlock(arrayOfDataFromDownload, error);
      });
}
Step3: Now use the method!
1234567891011
-(void)modifyWebData
{
  //assumes you have a shared data store, but if you don't you might have written the "getObjectsInBackgroundWithBlock:" method in the same file, in which case you can just call [self getObjects...]

  SharedDataStore *dataStore = [SharedDataStore sharedInstance]; //uses a singleton method in a class called SharedDataStore where the "getObjectsInBackgroundWithBlock:" method will be found.

  [dataStore getObjectsInBackgroundWithBlock:^(NSArray *queryResult, NSError *error) {
      //now do something with the queryResult data. If it were an image, maybe we'd resize it here, for instance.
      //or get an error back and deal with that!
  }
}
All that said, I wrote this blog to open up a discussion about good use of completion blocks, something I am still getting my head around. It sure does seem like modifyWebData does 2 things, and we all know that a method should only do one thing according to the single responsibility principle. So what now? For discussion.
First, a disclaimer: This is my first attempt at blogging in Octopress. Enough said. Surf my site at your own risk of getting frustrated. This disclaimer may have to appear on every blog post I create for the next few months too, but today’s is particularly tenuous.
Second, another disclaimer: You will not see all of the code you would need to write in this post just yet. Though I plan to augment this post with additional code in the future. I have just learned how challenging it can be to write objective-c code without the support of Xcode’s autocomplete feature! (It was always there to give me a push when I needed it.)
So, why would you roll your own Objective-C database? The Core Data API is built so you don’t have to do this, but let’s assume for a moment that you haven’t gotten your head around Core Data yet and/or you don’t wish to implement such a bulky framework to do a simple task. For example, let us say you need to be able to search the English dictionary (and don’t wish to use Apple’s autocorrect dictionary due to the many non-English words included in it.) Maybe you are building a scrabble game, for instance. For the sake of this discussion, assume you already have a text file that contains every word in the English language on its own line.
The quickest code you could write to search such a file might look like this (assuming you have already specified your filePath/fileEncoding):
123456789101112
-(void)createArrayOfEnglishWordsFromDictionaryFile{NSMutableArray*arrayOfAllWordsInTheEnglishLanguage=[NSMutableArrayalloc]init];NSString*allWordsInTheEnglishLanguage=[NSStringstringWithContentsOfFile:filePathencoding:fileEncodingerror:NULL];for(NSString*aWordin[allWordsInTheEnglishLanguagecomponentsSeparatedByString:@"\n"]){[arrayOfAllWordsInTheEnglishLanguageaddObject:aWord];}}//then go on to check the array for the word using NSPredicate or other method.
Objective-C is blazingly fast when it searches an array, but loading a dataset that spans into the hundreds of thousands of objects on an iPhone in this fashion might take a little while, and would have to be done every time the game was loaded (if not every time the dictionary was to be searched.) And if you just want to load it once per game, you have to keep it all in memory to avoid the constant re-building of the array. Instead, imagine you could just search the file directly and speedily to see if the word being suggested on the board was an actual word.
Final(?) disclaimer: I cannot say with what speed iOS can access and interpret an external file. This may impede the value of my theory here. Feel free to comment on this if you are more familiar!
With that disclaimer out of the way you must reorganize the data in your file. And for this, you must read the entire file in the way I described in code above once, but only at the time of development (not while a user is accessing the program.) But given you will be storing a local copy of this dictionary on each user’s phone, doing this once will be an unbelievable time-savings. I will not go through here how to reorganize your file in code at this time, but I will describe it in prose. The point of this post is to consider the gains in running time, and demonstrate some of the code, but perhaps I can come back later and elaborate on this step more explicitly.
One way to do this would be to assign each letter in each word its ASCII integer value, and add them up for each word, giving each word a score that can then be used as a key to place it in the back in the file appropriately. This score would then be placed to the left of the word it represents, such that it is the actual key for the word being searched; the code below assumes such a format.
E.g. The word AND would be equivalent to the scores 1 + 14 + 4, or 29.
Now all you need to do is run a recursive binary search on the file to discover whether the word that has been placed on the board is real or not, and you may run the search with runtime of much closer to 𝚯(log n)!
Here is a sample of what that code might look like:
NSIntegernumWordsInDictionary=200000//assumes you know the number of lines (words) in the file for simplicity of the example-(void)findWordInBinaryTreeDictionary:(NSString*)aWord{self.wordScore=0;for(inti;i<[aWordlength];i++){self.wordScore=self.wordScore+[aWordcharacterAtIndex:i];}NSInteger*foundSameIndexAsWordBeingSearched=[selfrecursiveBinarySearchOnDictionary:numWordsInDictionary/2];//finish this by adding code to check predecessors and successors for the same score. create an array of these and linearly (or with Cocoa API at faster speeds) search this subset only.//a further enhancement for a game like scrabble might be to use the number of letters in the user's word as a secondary strategic sort key to further limit the number of words to be searched linearly.}-(NSInteger)recursiveBinarySearchOnDictionary:(NSInteger)lineNumberToBeChecked{NSIntegerwordScoreOnLineNumber=[[NSStringsubstringToIndex:[lineNumberToBeCheckedrangeOfString:@" "]]integerValue];if(wordScoreOnLineNumber==self.wordScore{returnlineNumberToBeChecked;}elseif(wordScoreOnLineNumber<self.wordScore){[selfrecursiveBinarySearchOnDictionary:lineNumberToBeChecked*1.5];}elseif(wordScoreOnLineNumber>self.wordScore){[selfrecursiveBinarySearchOnDictionary:lineNumberToBeChecked/2];}}
Using code similar to the above (which is pseudo code for sure, given this is an early draft post) you would then want to run steps to check the wordScore values on predecessor and successor line numbers in the file to then linearly search a subset of words for the word you are seeking. And voila, you will efficiently locate (or not locate) the set of characters the user has tried placing on your scrabble board and in turn, created your own basic database using a combination of binary search.
Other potential uses for such code include datasets of every geography in the world (of which some databases catalogue over two million inclusive of all levels of geography). Can you think of a few?
One final thought: Using alternative data structures such as balanced binary search trees might make this implementation more robust in cases where the dataset is mutable. But given we do not need to add/remove data from the English Dictionary example with significant frequency, we can be satisfied with the above method.